May 6th, 2009
Sprouts for All
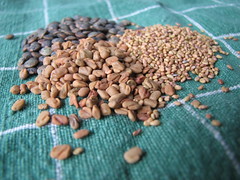
Fenugreek, Puy Lentils, Alfalfa
I don’t remember how young I was when I started sprouting but when I moved out of my parents’ house, the sprouting trays came with me. My earliest memory is interviewing my elementary school principal for the school newspaper (was I 8? 9?) and on his desk was a mason jar full of alfalfa sprouts. I remember being so fascinated that he was growing food in his office. The nice thing about sprouts is that you can do it anytime of year, but spring tends to remind me to sprout more often. Especially when my peas have just sprouted in the garden, I remember to keep on sprouting in the kitchen. Sprouting is extremely easy and anyone can (and should) do it. Store-bought sprouts are expensive and have less nutrients than freshly sprouted seeds from your counter top. Plus you have a variety of sprouts to choose from at home, unlike the salmonella ridden alfalfa and mung in the cooler section.
Sprouting is not rocket science, yet people are always amazed that I have a tray of sprouts at any given time. It is a natural process, the germination of a seed to become a plant. Sprouts, though tiny, are nutritional powerhouses. Different seeds contain different properties but as a whole they provide antioxidants (anti-aging), phytochemicals (disease prevention) and are high in bio-photons (meaning a high energy life force, read anything about raw diets and this can be described further). So, chlorophyll, vitamins, minerals and protein all in an easy to digest crunchy sprout. I can continue describing how healthy they are, but doesn’t the world already know? Let’s discuss how easy it is to make…at home.

Fenugreek
For any plant to grow, we need a seed, moisture and eventually sunlight. For sprouting purposes, please buy organic because you don’t want pesticides concentrated in a sprout to enter your body. The best place (and most affordable) to get seeds for sprouting is the bulk section of a grocery store or natural foods market. Then you can buy a tiny bit and see how it goes. Some bulk areas sell sprouting “mixes” which are a mix of seeds but I think it’s overpriced and the simple fact that not all seeds sprout in the same time period, I would rather buy them and sprout them individually and mix later when they are all at their peak. Sprouting is not an expensive investment. I think it’s even one of the most affordable food sources in relation to nutrition. Most seeds, beans/legumes and grains are sprout-able. Wheat berries sprouted become wheat grass. Lentils tend to be my favorite legume to sprout because they have a mild taste but great crunch. Alfalfa is the most well known sprout and is the most versatile. Radish seeds are nice and spicy and are a favorite of mine as well as fenugreek. I’m not crazy about buckwheat but that’s because I’m too lazy to remove the hull before eating so it’s sort of a rough texture. The list goes on and on…but it’s time to talk about the process.
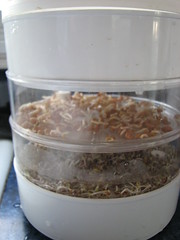
My sprout trays
I have lovely sprouting trays that have indentations on the bottom and all I do is fill the tray and it has it’s own draining system, leaving behind just enough water to keep the seeds moist to sprout. I’ve seen larger versions of mine as well as a whole plethora of other sprouting systems. The easiest method with materials that everyone around the world can access is the old glass jar with cheesecloth tied to the top. Each seed has it’s own ideal soaking time for sprouting but honestly if you don’t soak it long enough there’s a good chance it will still sprout.

Alfalfa
The method with the jar is easy: Soak seed in water. I use about a tablespoon of sprouting matter per tray. In a quart mason jar I would also put about a tablespoon, or enough to make a thin layer of seeds along the side. The last thing you want is too many seeds becoming a rotting, stinking mess. Drain off water, rinse and drain well. Place cheesecloth (or linen or whatever) over the top, secure with rubber band and store jar on it’s side (just in case there’s too much water left behind the seeds won’t rot in it). At least twice a day, fill jar with water and drain. You might not even need to take off the cheesecloth, just turn it upside down over the sink to drain. Within a few days to a week (depending on temperature/humidity) you will have lovely sprouts. You can eat them once a little tail has grown or give them more time to develop it’s first leaves; it’s up to you. Before storing, I give them a final rinse (some people like to rinse off the hulls but I’m lazy and don’t mind the extra fiber) and put them in an airtight container in the fridge for up to a week.

Salads are better with sprouts
Remember, sprouts don’t have to be boring. Most people thing their only place is on salads but you can throw some on top of a stir-fry before eating, add to sandwiches, even soups. I’ve been throwing mine in my smoothies lately with good results. Here’s a list of sprouts, soak time and my comments for your convenience.
- Alfalfa (neutral flavor, not too crunchy): I honestly don’t soak these but I’ve heard 1-6 hours. They will sprout in a day or two.
- Quinoa (similar in taste/texture to alfalfa, perhaps a bit less crunchy): Soak 2 hours.
- Lentils (my favorite! Nutty, crunchy and a little bit spicy): Soak 8 hours Red, green, yellow, French. They are all good.
- Radish seeds (spicy little sprouts): I don’t soak them but you can do 2 hours if it makes you feel better.
- Fenugreek (smells like curry, great crunch, moderate spice): Soak overnight to 12 hours
- Wheat and Spelt Berries (great at any stage, more chewy than crunchy): Soak overnight to 12 hours
- Mung Beans (neutral flavor, great crunch): Soak overnight to 10 hours. I can’t get mine to look like the store ones, I think you need to keep them out of the light completely.
- Buckwheat (the hull can be papery. I prefer to soak and dehydrate buckwheat for granola instead of sprouting. Don’t use Kasha, I think it’s already cooked. I haven’t tried hulled buckwheat): Soak 30 minutes.
- Clover (similar to alfalfa, but more “delicate” tasting): I don’t soak but my guide says 6 hours.
- Chia (is a disaster. It becomes a gelatinous mess like flax does). I soak chia overnight and throw the whole thing in a smoothie. I have not experiemented further. It clogs up my sprouting trays.
- Flax: same as chia, but I don’t sprout it. I prefer it just ground and added to smoothies or in baking.
- Broccoli Seeds (great for salad, small sprout, neutral taste): Soak overnight
- Chickpeas (are fun to sprout. Raw hummus!) Soak 48 hours.
- Peas (fresh and crunchy) Soak overnight to 12 hours.
This is only a partial list of what I have sprouted. I think the best compilation of a sprouting guide is in Vegan World Fusion, which has a lot of recipes that uses sprouts or soaked things if you want to enjoy some delicious raw food.
May 10th, 2009 at 5:47 am
I’m so happy you blogged about this kimmy. I’ve been meaning to start sprouting for ages now but I’m always a bit nervous because I will be using the jar method. Guess I’ll just have to go for it.
I bought some sprouted Broccoli from the supermarket the other day and put in on top of Pizza! It was SUPERB!
June 23rd, 2009 at 8:15 am
Don’t be scared of sprouting in a jar. It’s easy, cheap and hard to mess up. Sprouts on pizza sounds delicious.
August 25th, 2009 at 11:47 am
hi there– thanks for the post. i’ve been sprouting organic aduki beans for a while now, using the jar method, and it works great. they’re helpful for people with damp-heat (according to traditional chinese medicine) like me.
August 25th, 2009 at 2:17 pm
Yum, aduki! I’ve never sprouted those before. Right now I’m in a mung craze.