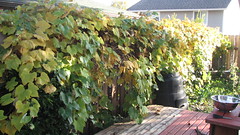
Last Cooking Class of the Summer: How to make tempeh & tofu

Just a quick reminder that my last scheduled class for the summer is coming up.


Homemade tempeh

Here’s the blurb:

Thursday, July 15, 6:30-8:30pm
MAKE YOUR OWN TEMPEH AND TOFU

Do you enjoy eating plant-based foods and incorporating tempeh and tofu into your healthy eating plan? Learn to make these healthful foods at home—it’s affordable and tastes better than store bought! Join Kim in this demonstration and tasting class as she shows you how to create these versatile vegetarian and vegan staples. She’ll also share an easy recipe for these healthy foods, which you can recreate at home.
$30 per student/14-student limit

Popularity: 1% [?]

Get my blog entries in your inbox!

Once upon a time I loved the RSS feed. Then most of the blogs I read stopped updated and I lost interest in going to my Google Reader to find out there was no new news. But I will always check my email and have found that some people only have time to check their email and not specifically go to websites or readers. So it is to those readers I unveil the email subscription link. It’s at the top of the right side toolbar and is easy to set up and convenient. Then you can receive emails with my newest blogs instead of obsessively checking my blog every day to see if there is a new post. I can guarantee you I won’t be blogging on a daily basis any time soon, but the entries will continue as long as my spice drawer is stocked.

Popularity: 1% [?]

A Grape Juice Recipe to end them all


Canned and melding

During our joys of jellymaking last fall, I found a really interesting recipe in the tips section of Mother Earth News Magazine (August 2009) where a reader submitted a recipe to make grape juice. Obviously it sparked my attention because I was planning a serious processing party for my grape vine. It sounded easy and straightforward and I am happy to admit it was. Thanks, Suzanne! All I did was set aside enough grapes to test the recipe for 2 quarts of juice concentrate. Well, if I must be honest we did 3 quarts but broke one of the mason jars in the canning bath but I won’t get into that adventure. All you need are 2 cups of grapes per quart jar and she suggests 1 cup of sugar (I did one jar with 1/2 cup and one jar with 3/4 cup of sugar: 1/2 cup is plenty!) and boiling water to fill the jar. We processed the jars for 10 minutes and Suzanne tells us in six weeks to strain out the liquid, dilute by half with water and enjoy.


Juicy Juice minus the devil

Six weeks after we canned the juice we entered the holiday season and I also entered my first trimester (forgetful? check. tired? check. inability to be productive in the kitchen? check) and the grape juice concentrate was sadly neglected on the counter behind my ignored kombucha. So I didn’t follow the directions completely but I’m happy to share that I opened the jars 7 months later (shhh!), strained out the grapes and it tastes absolutely amazing! I diluted a quart of the juice for drinking and re-canned the remaining concentrate (sans grapes) so hopefully they will keep just as a juice. If it doesn’t, then at least I know that canning the whole thing and forgetting it was not a waste of time. This was way too easy to not plan to make massive quantities of juice next fall. I’m not the biggest juice fan but that’s usually because I don’t like all the sugar and high fructose corn syrup. But this came from my garden and is better than any store grape juice I have ever drank! I can imagine it being lovely this summer over ice with a little seltzer water as I lounge in the sun in my hammock (if the sun decides to grace the northwest this year).

Popularity: 1% [?]

Last Fall’s Grape Harvest Results


On the vine

One thing I have missed from our house in Seattle was our mini-orchard. We had so many fruit trees (plums, apples, pears) that came with the house and produced abundantly. I love being able to walk barefoot in the yard and pick some fruit to eat. Our current house has a much smaller yard (less maintenance!) and while we could plant fruit trees and wait, there’s something satisfying about established trees in your yard. We found out last year that we have a monster Rainer cherry tree that produces fruit higher than we can pick and an amazing grape vine. It’s rooted on our neighbor’s side of the fence, so hopefully they don’t get rid of it any time soon. Most of the vine grows onto our side of the fence and I expected to get a few bowls of grapes for snacking. Try thirty pounds!


What we’re working with

My parents grew grapes and I always enjoyed snacking on them and spitting out the seeds. The concept of seedless grapes to me was always strange, those were “grocery store” grapes. I have a distant memory of my parents making grape jam one fall. They took over the whole kitchen and I’m sure there was frustration in the air because grapes stain and they are messy. And they have skins and seeds. But the taste of that jam was SO delicious. Better than any Welch’s sugar syrup with grape flavor. I think they only made the jam once and left most of the fruit for the birds.

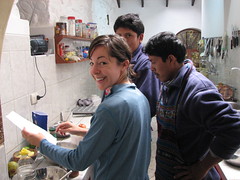
So I’m not sure if I was crazy to attempt to process our grape harvest but I am not one to let things go to waste. I had an encouraging canning partner, the Mayor of Hooperville beside me with ideas and energy and a shared passion for domestic arts. We went to town on those grapes. It was a project that lasted more than one day and included some fails and some wonderful stand-bys that I plan to use this fall (much more efficiently I might add). Our plan: grape jam (lots of it!), grape juice concentrate and pickled grapes (of course). No wine trials this time around. There is way too much to go wrong and a lot of equipment needed that I am not ready to invest in.
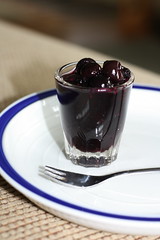
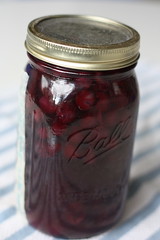

Pickled Grapes

The pickled grapes were relatively easy and the flavor was good. I found a recipe in the September 2009 edition of Vegetarian Times for them. It was very straightforward and was a fun savory experiment for grapes. My only gripe was that this recipe is for seedless grapes (which I disregarded) so when eating these pickles you end up spitting out a lot of seeds. I’d rather make pickles from cucumbers and save my grapes for jam and juice.
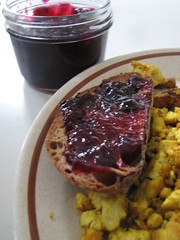
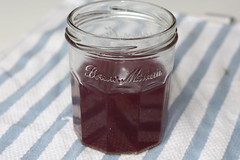

Jam on Toast

The jam was the main goal for us and after some trials and staining most of my dishtowels, a great success. We tried the recipe from epicurious (Concord Grape Jame Oct 05) but the process was very laborious and time consuming. You have to peel the grapes, puree the skins, then add them to the naked grapes and cook it down, THEN strain it and cook it down some more. It seemed like there were a lot of unnecessary steps but I wanted to try the recipe because it didn’t call for any pectin. Which is too bad because it never gelled. We had it on the stove for hours and ended up burning it. We tried a batch in the crockpot and ended up caramelizing it (grape molasses, anyone?). It was a waste of time and now I know.


Processing

I am in love with Pomona’s Pectin. Most pectins rely on sugar for gelling so that’s why the majority of jams and jellies out there are loaded with sugar. When a fruit is ripe and at it’s peak, you don’t need to add much sugar, which is why I adore Pomona and her genius. After our epic fails, we followed the recipe in the Pomona box and not only did it gel, but it turned out tasty and not overly sweet. For those of you who want to try it, for one batch I used 7 pounds of grapes to make 8 cups of juice, 1/2 cup of lemon juice (I wonder if apple cider vinegar would work?) and 3 cups of evaporated cane juice to yield 6 pints of jelly. I figured for the first time I would go in the middle of their sugar recommendation range. This method was much easier, used less equipment (less cleanup) and we didn’t have to peel the grapes and go insane and it took two days because the juice needs to drip out overnight, which wasn’t a big deal. I don’t have a jelly bag and I just used 3 or 4 layers of cheesecloth in a strainer over a bucket. It involved some waiting time but I’d rather deal with it the next day than have to peel grapes ever again.

Popularity: 1% [?]

Horchata in a Hurry


Almond Horchata

I know there has been a lapse on my part in blogging. I have been blogging in my head but not online because my time in the kitchen has slowed. I had a few epic projects this winter that I will share with you but this spring has consisted of simple meals and very little photography as my focus has shifted to a state of pregnancy, which apparently means hours on my feet in the kitchen haven’t been enjoyable. But I am feeling great and past the food aversions, which is wonderful to enjoy food again.  I had my first food craving last weekend, which was a crazy experience.

All of a sudden I wanted needed horchata. Living in Portland around so many Mexican food carts you would think this craving would be easy to appease. We went to 4 taco trucks and a Mexican restaurant to no avail. But this was a craving… an experience unlike anything I have ever felt. Sometimes I desire certain dishes or ingredients but if I don’t have it on hand it’s not a big deal. This was a big deal. When I realized I wasn’t going to find my horchata I wanted to cry.  I admit I did cry.  My muscles seized up and I felt paralyzed, unable to make decisions.  All I could think about was the creamy refreshing taste of horchata that was not in my possession. Back at home my husband went to try one last taco truck by our house (no luck) while I had a revelation that there were almonds soaking in the fridge. Why not make my own? It would take less time than driving all over the city and crying for want of horchata. So I did. And it was delicious and the beast was appeased.

I must mention that traditionally horchata is made from white rice, usually ground and soaked overnight then blended with cinnamon and sugar (and strained). I have seen a few recipes around that use a combination of rice and almonds but as I did not have the patience to wait 8 hours to soak rice I made a quickie version that satisfied me to no end. I promptly drank my beverage and took a nap. Here is the recipe, it made one pint so if you want to share I suggest doubling or tripling the recipe.

Horchata Almendra
makes 1 pint over ice

Ingredients

  • 1/2 cup raw almonds, soaked overnight
  • 1 cup water
  • pinch sea salt
  • 1/2 tsp agave (or whatever sweetener you desire)
  • 1/4 tsp vanilla extract
  • 1 tsp cinnamon

How-to

  1. Drain the almonds and rinse them.
  2. Place them in a blender and blend until pulpy (you may need to add a little water if your blender is old and weak like mine is).
  3. Add remaining water, blend until smooth.
  4. Strain using a nutbag, tripled cheesecloth or whatever works best for you.
  5. Pour the milk back into the blender and blend with agave, vanilla and cinnamon
  6. Serve over ice and enjoy!

I’m sure this would last 5 days in the fridge but I haven’t tested it yet. Horchata never lasts longer than 10 minutes in my hands.

Popularity: 2% [?]

Portland Area Cooking Classes

Just a heads-up, I’m scheduled to teach a few cooking classes at New Seasons this winter. Come join in the fun! You can register by phone or in person at the Happy Valley Store.


Me in action

The line up is:
Wednesday, January 20, 6:30-8pm
SPROUTING AND GREEN SMOOTHIES
With the New Year come new resolutions to eat more healthy foods. Join me for this informative demonstration
and tasting class on how easy it is to grow your own sprouts and then, with a little ingenuity, incorporate
them into flavorful, nutritious smoothies, perfect for enhancing any resolution – New Year’s or otherwise.

Friday, January 29, 6:30-8:30pm
VEGAN LASAGNA DINNER
Join me in this hands-on class where you’ll learn to make a delicious, savory vegan lasagna. We’ll start
with a freshly made tomato sauce, create a creamy tofu ricotta and add in great veggies. While the lasagna
is bubbling in the oven, Kim will teach you the basics of salad composition and dressing. Add a basket of garlic bread and the meal is complete!

Wednesday, March 24, 6:30-8:30pm
TEMPEH AND TOFU DEMYSTIFIED: MAKE YOUR OWN
Do you enjoy healthy eating with tempeh and tofu? Did you know that you can make these tasty, versatile foods at home? It’s affordable and tastes even better than store-bought! In this demonstration and tasting class, Kim will instruct you on how to create these vegetarian and vegan staples. She’ll also share with you an easy recipe for preparing these healthy foods at home.

Popularity: 6% [?]

Happy Thanksgiving! What did I serve?


Let’s eat!

This year for Thanksgiving I became an adult, well, in a way. After a lifetime of attending holidays, sitting at the kiddie table and being the girlfriend/daughter/wife who brought her own main entree because turkeys as food are not in my vocabulary, I hosted a holiday this year. Not just any holiday, the grand poo-bah of food holidays in America. Thanksgiving is about eating until you burst and I’ve never been a fan of that much excess, but I’m a fan of food. I’m happy to provide an excess of food and you can choose how much to (over) eat. I’m very blessed to have in-laws that were willing to make the trip over the mountains and through the woods to Portland to not only spend Thanksgiving with us in our new house, but to have a turkey-free Thanksgiving. I told people if they couldn’t live without the bird, it was their responsibility but everyone was happy and willing to try the seitan animals. We even had special guests at our table this year, the famous Tofu Phil of Small Planet Tofu and his girlfriend. Most people arrived Thursday morning, which meant by default that I did most of the cooking. I was excited to plan a menu for 12 and I went a little overboard. Hey, culinary school ruined me. I can’t just serve three courses and be satisfied. I was a little worried things wouldn’t turn out right but my husband and I worked on some dishes a few days leading up to the big event so the day of we were able to play a few rounds of hearts while the casseroles were in the oven. Everyone helped in the kitchen and I’m happy to say that the food was all hot at the same time, and I’m flattered that everyone ate their fair share plus some.


The savory spread

Let’s talk about what we ate, which is the meat of this post. For snacking there was a wide variety of hummus (even though that’s the stereotype of veg*n food, I do enjoy hummus and was happy to have a million kinds on the table plus chips and crackers and a veggie platter for dipping). The main meal was as follows: (excuse the poor lighting, we were hungry and setting up a light tent was not in the best interest of the group)

  • Apple Sage Seitan Creatures (recipe here)
  • Maitake-Shiitake Gravy
  • Roasted Garlic Mashed Yukon Golds (I used almond milk this year, yum!)
  • Green Bean Casserole, courtesy of FatFreeVegan
  • Garnet Yam Casserole with Brandied Raisins and Walnuts (this year’s Gourmet holiday issue)
  • Roasted Butternut Squash with Rosemary
  • Roasted Brussel Sprouts off the stalk with Garlic
  • Fresh Salad with tomatoes from our garden (yes we still have some on the vine)
  • Dressings: Raw Caesar (ED&BV) and other bottled options

Dessert Station

Desserts:

  • Pumpkin Cheesecake (SweetPea recipe, can not share, top secret) with Gingersnap Crust
  • Apple Crisp (Mom’s top secret recipe, email me if you want it)
  • Apple Cranberry Pie with Crumb Topping (easily veganized)
  • Pecan Pie
  • Strawberry Rhubarb Pie (courtesy of MIL)
  • Truffles, 2 kinds. One had orange extract and chopped cherries mixed in and the other had banana liquor. They were rolled in toasted coconut, cocoa powder or ground pistachios. I used almond milk and 70% bittersweet chocolate as the base and agave as the sweetener

Apple Sage Seitan Animal-free Creatures

Here are the seitan creatures as they hit the grill pan. I didn’t take many pictures this day as I was focused more of cooking and feeding than blogging or pictures. Thanks husband for snapping a few shots so I can share how much we ate. My advice for people that want to have a big holiday (there were 12 of us) is to definitely prep the casseroles a day or two in advance. Also, make the mashed potatoes ahead and reheat then in a crock pot to save counter space. I did all the desserts the day before and assigned truffle rolling the morning of Thanksgiving to other people. I made most things ahead, especially the seitan, but we seared it off right before we ate. So if you want to know what I did the day of (with help): toss salad, make salad dressing, bake off casseroles, roast brussel sprouts, sear seitan, roll truffles, set up appetizers and reheat everything else. Once the food was set up for the buffet, I put the pies in the oven to reheat so they would be ready.

Popularity: 4% [?]

Wild Foods: Cattails


Cattail rhizome and shoot

Cattail Flower

I have joined John for another adventure, one I was a little apprehensive about doing but excited nonetheless. This class was all about learning to extract one part of the well-known cattail for edible purposes. We focused on the rhizomes, apparently there are many parts of the cattail that are edible, but it depends on season what part you can eat. The ideal time for rhizome consumption is late fall to early spring. You can eat the leaf bases in late springs and the flower head in early summer. Late summer brings us to pollen season, where you can use cattail pollen as a flour supplement or thickener, which I think is fascinating (gluten-free folks, take note!) It’s a Native American staple and learning about all the edible and medicinal uses of this plant which provides year round nourishment, I think it’s interesting we don’t really know much about this plant other than that it dries up wetlands and takes over. On second thought, I do know why we don’t harvest and process it in our modern ways, it’s labor intensive! you need a group that works together well! it takes a lot of work to extract a small amount of food. I’m glad I learned all about cattails but once again, it is a food source I wouldn’t seek out. Picking mushrooms is much easier and the woods don’t smell like a swamp.


Rhizome in the dry swamp

The day we set out to gather the rhizomes, we were unsure of the conditions. We were warned we might be chest deep in mud (which means I should bring a life jacket because I’d be under water). I packed a lot of clothes and the day was crisp and chilly. We geared up and headed into the swamp only to find that it was dry. It was more comfortable to sit in the dirt and dig out the rhizomes but it was much more difficult to get at the rhizomes themselves. It was like weeding on a large scale but you are digging underneath big tall cattails, trying to separate the rhizomes, which grow horizontally and criss cross over each other in multiple directions. The hard part was not just pulling these guys out with brute strength, we had to be delicate because there’s a lot of bacteria in swamp mud dirt and if that has contact with the inner starchy layer we were going to eat, there’s a chance of sickness. I think if it was muddy the rhizomes would have been easier to expose and separate, but that was not in the stars for us today.


Peeling away the outer layer

Cattails reproduce by sending out their rhizomes in a horizontal fashion, upon which new shoots grow vertically. In a way, they are cloning themselves much like aspens do. The new shoots are edible and taste somewhere between a water chestnut and celery. The part we were after was the rhizome, which we harvested as best we could and then washed and rinsed and washed and rinsed as well as we could. Once it was more or less clean, we had to peel away the outer layer, leaving us with a fibrous inner core that involved even more labor. A long slow process, we separated the starch from the fiber and dried the starch (it reminded me of arrowroot). Since we were all amateurs, a lot of fiber ended up with the starch, which means that upon pancake party time, there were some hairball pancakes.


Cattail Pancakes!

The pancakes John made for us were gluten free and he used the cattail starch instead of flour. The batter was a little thin and delicate, like crepe batter. The addition of tapioca starch helped a little with stability. But I have never had GF pancakes before, I’ll have to give them a try now and see if there’s any tweaking that can be done. Watch out, I’m going to open a food cart and sell cattails: 10 ways. Isn’t learning fun? Especially when eating is involved. I can’t wait for John to offer the seaweed identification class next year, I’ll be first on the list for that to harvest up some kombu.

Popularity: 6% [?]

Wild Foods: Acorns


The elusive acorn

A few months ago I had first heard about John Kallas and I went to his website and realized he has all the knowledge that I want to have. I must meet and learn from this man. Finally the stars aligned (and work schedules) and I attended his acorn extraction class. Now we all know that acorns are a nut. The nut of the oak tree. There are many species of oaks and to my knowledge they are all somewhat edible. Not edible raw, I must stress. They have lots of tannins and don’t taste good (or are nutritious?) until after a laborious process. But I love slow foods, as long as I’m not starving and have the time and patience for it. So this class was right up my alley; something new to learn about that combines my favorite things:


Photo by mstoy
  1. nature
  2. trees
  3. foraging for food
  4. cooking
  5. eating.

Grinding the acorns

Now I’m sure most people have heard tales of acorns being edible but that’s as far as the myth goes. How to eat them, what to do with them, these are the questions I needed answered. John’s classes are very informal and the acorn laborers who paid for this class were a motley crew varied in age and background. And we all came together to eat acorns together; it was a beautiful thing. We took a walk around his neighborhood and we talked about identifying oak trees and types of oak trees. White oak acorns have less tannins than red oak acorns. Some acorns have very little nutmeat and aren’t worth the effort. We didn’t gather acorns that day, but the walk was nice and we lucked out with the weather, even if it’s finally too cold to wear my Chacos as my main shoes. People who had access to acorns brought them and we spent a good portion of the day with hammers and rocks, peeling the nut meat away from the shell. It wasn’t too difficult but it reminded me of holiday times sitting around the bowl of nuts trying to open those Brazil nuts with all my might. Hammers do the job pretty quickly and we only had a few acorns that were infested with larvae of some creature.


Acorn Meal

Once we exhausted ourselves separating the nut meat from the shell, we ground them in a meat grinder. The desired consistency is like grape nuts. The next step requires us to dry out the meal for a minimum of a week, but since we weren’t staying at his house for a week, we had last year’s class grind ready for us. We had to do a second grind, and it’s amazing how much kids like to work if it’s not considered “work.” Most of our grinding was child labor, but I guess it’s legal if they are not getting paid for it? The second grind was with a stone grinder (he had an attachment to the meat grinder) but somehow the stones got too hot and we started making acorn butter, which is not the desired effect. We want to make a flour and keep the fats intact. So we turned to modern machines and pulsed it up in a food processor which worked quite nicely.


Pudding…what’s left

Then we had to soak the flour in water to leach out the tannins. We experimented with different methods but the basic goal is to keep changing the water until it runs clear. Squirrels and birds that cache acorns do the same thing with acorns, except groundwater percolates through them and by the time winter comes, their meal is ready. Once we had relatively tannin-free acorn mush, we made pudding! Acorn meal has a relatively high fat content and can spoil easily so we used it the same day and ate it the same day. The flour can be used in breads and puddings (I wonder how it would work for gluten free goodies?). The pudding was sweetened with lots of sugar but there is no need for a thickener because as the acorn flour cooks up it becomes deliciously thick on it’s own. The most common way of eating acorn mush is as a cooked gruel, which I think wouldn’t be bad at all with some berries mixed in. The flavor reminded me of almond meal, but not so almondy. I liked it but I think if I had to go through all this trouble to eat acorns, I might as well not have a job or house because it would take up a greater part of my time. I’m really glad I took the class and it was fun and informative but I’m happy to leave the acorns to the woodland creatures.

Popularity: 7% [?]

I love foraging


This is what 6# looks like with bad lighting

I can’t hide my feelings of excitement towards foraging. I’m not afraid of what others think because honestly, I wish we all could have these skills. We once used to, you know. I wish we could all band together and share knowledge and time and excitement around this connection of food and life. And I wish I didn’t sound so crazy saying things like this. But I am happy to know I’m not alone and there are plenty of other people out there who may have the same feeling about walking through the forest and wanting to know every plant that is in your path and whether you can eat it or not. Or what foods to best pair it with. I don’t want to go out and live in a tent, I like hot showers, too. But I find this passion of mine that centers in food and nature is not waning. It scares me sometimes but I’m glad I still have a desire to learn more, know more, cook more, and eat. And share!

My dog is my current foraging buddy and we had our first mushroom hunt together. She was a little confused when I walked off trail; apparently she is used to the trail and likes the trail. She’s happy to sniff at the edge of the trail or go check things out, but the trail is safe to her. She knows that’s where we belong. Most of the time. I ventured off into rain soaked ground cover (not ivy, not salal, not ferns…sort of if ferns and holly hybridized, that’s what it would be) and my dog waited for me by the path as I went off looking for the impending motherload of chanterelles I would find that day. I must mention that Ubu is my first ever dog. And I love her. I have had goldfish (who never appreciated me reading books to them as an 8 year old) and parakeets that I pretended were puppies (I had one who would fetch dimes and run around the house with a dime in his beak. Seriously.) But I’ve always wanted a dog, a hiking buddy, someone that’s happy to see you when you come home, no matter how grumpy you are or how long you’ve been gone. She’s been a great hiking buddy lately and I thought maybe with that nose of hers she could be my truffle pig. She sniffed the first chanterelle I found but it was not interesting to her so she didn’t offer me much help during the day except to remind me where the trail was occasionally and that she wanted to move on. Regardless of her desire to hike far and long, and despite the random rain showers, it was a great day to be in nature and a great bonus to find as much as I did. I tried to find the spot where I found a cauliflower mushroom last year, but couldn’t. That’s fine because I ended up with six pounds of chanterelles and one monster lobster mushroom.


The biggest chanterelle I have ever seen

Luckily, chanterelles last pretty long in the fridge in a paper bag. I add a damp hand towel to maintain some moisture and it’s been about a week and they still look good. I froze about half of my bounty using the dry saute method, which I’ll outline below. Chanterelles have a high water content so it’s best to give them a dry saute before freezing or using since so much liquid comes out of them and we don’t want slimy gross mushrooms for dinner.

To dry saute mushrooms:
1. Heat a pan over high heat.
2. Add cleaned mushrooms and sprinkle with salt (this helps draw more moisture out and enhances the flavor)
3. Keep them moving in the pan until they release their liquid and keep them moving around in the pan until the liquid has evaporated (or you can pour off the juices and save for sauces, gravies, or whatever you desire).
4. Once they are dry-ish, add some fat of choice (olive oil, margarine etc.) and at this point I add minced garlic. I like garlic.
5. Reduce the heat to medium and saute for 5-10 minutes. Ideally you want to cook these mushrooms a minimum total of 10 minutes because they are wild and the books say to do it.
6. I tend to lay them out on a cookie sheet and freeze them (then transfer to a freezer bag) at this point or keep in the fridge in an airtight container for as long as you are comfortable (a week if they even last that long). OR, continue cooking and add them to whatever you were working on.

My remaining fresh mushrooms have graced my pasta dishes and snuck into my tofu scrambles. I even made a big pot of cream of chanterelle soup, but I used soymilk in it and wasn’t crazy about it. I think it may need a thick cashew milk or maybe less liquid. It was still delicious but I really wanted it to taste like Campbell’s Soup. Most of the mushrooms were straight up side dish mushrooms and garlic. I intend to go crazy and experiment with them but they are so good fresh and hot that that is the preferred option. I hope to make time to do the fried mushroom dish in Artful Vegan (I think they use oyster mushrooms) but I am always intimidated with the serious time dedication most of his recipes involve. We will see.

Popularity: 4% [?]