How to Clean a Mushroom

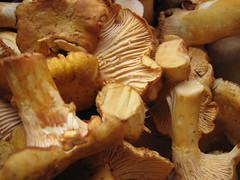
I end this wild and wacky mushroom week with sage advice. Don’t wash your mushrooms! I cringe whenever I see someone cleaning mushrooms that way. Mushrooms are like little sponges and if you submerge them in water, it changes their texture for the worse. I come from the belief system that a little dirt is actually beneficial for you (immune strength and b12). I don’t eat handfuls of dirt, but I refuse to wash my mushrooms. If this freaks you, read on. I still clean mushrooms, just with a different method.

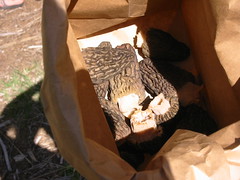
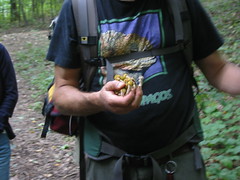
While foraging, I try to clean as much dirt off in the field as I can. I’m lazy and use my knife and blow on the gills. You could carry a little brush with you (which I will when my current toothbrush goes kaput). But back in the kitchen for wild mushrooms or storebought ‘shrooms, the best way to clean them is with a damp towel. I find a damp paper towel works best, but it is wasteful to use paper if there is an alternative. I have a stack of bar rags in my kitchen and they serve this purpose beautifully. I dampen them and gently wipe away any offending dirt. You can easily clean the stem with a paring knife. I rinse out my rag, dry it on the faucet and then throw it in the hamper. When I have a bigger kitchen, I may have a designated mushroom rag with it’s own hook. Right now, space is of the essence where I live and I can’t be draping towels all over the place.

So please, please do NOT wash your mushrooms. Lightly brush away the dirt with a towel/rag or mushroom brush. Has anyone tried these fancy brushes? I’ve seen them in the stores but haven’t tried any. Thanks for listening. Mushrooms across the world will have their dignity back.

Yellow Chanterelles


Cantherellus Formosus

My current favorite mushroom is the chanterelle, Cantherellus Formosus. They have a great texture, firm but not too chewy. My books say that they smell like apricots, although some beg to differ. I think it has a very fresh, floral smell. I also like that they aren’t dirty mushrooms like lobsters who grow in the duff or morels who harbor bugs. They are pretty easy to spot as well, being a nice yellow-orange hue. In the West coast they pop up in the fall, so the big challenge is to tell them apart from fallen leaves. On the east coast, their season is earlier and longer, from June to November. Their shape is elegant and stately, the cap grows up in a trumpet shape and has delicate ridge-like gills that travel down the stem. Technically, they don’t have true gills like your classic button mushroom. Their false gills look like wrinkles and they fork off along the underside of the cap.


In their natural habitat

They are also known as egg mushrooms, girole and pfifferlings. There are many different types of chanterelles out there, including the white chanterelle which grows in the Pacific NW (I haven’t found those yet). My brother in VT commonly finds yellow foot chanterelles. On the East coast, they are mostly found in hardwood forests or mixed forests. In the Pacific NW, they tend to grow under conifers (pine, Doug fir) and oak. Chanterelles can be found alone, scattered or in large clusters.


Sauteed with garlic

I prefer them fresh, but you can also dry them or dry-saute and freeze the mushrooms. To dry sautee, just heat up a skillet and add the cleaned mushrooms. Once they have released their juices, they are good to be frozen (with or without their juices). Once frozen, they are good for a whole year to get you by until next chanterelle season. I have a batch in my freezer waiting for their future in a mushroom soup. I use them in any dish requiring mushrooms, but it’s good to eat them with simple dishes because chanterelles have such a delicate flavor. I tend to sautee them with some garlic in a mixture of olive oil and Earth Balance. I have no patience to make anything fancy with them, but the Wildman has an interesting recipe for a chanterelle custard I’ll try next time I have a batch in the house.


Chanterelle Pesto Pizza

Last, but most importantly, there are 2 look alikes for this mushroom. The toxic Jack O’Lantern (Omphalotus illudens) is very similar to the chanterelle, except that it glows in the dark and has very distinct gills that are thinner and more crowded. This website has really good photos for gill comparison. Luckily, it won’t kill you, just make you really sick. Jack O’Lanterns are always found on decaying wood or trees and grow in clusters, which is not true of the chanterelle. The other look alike is the false chanterelle, which is edible but apparently not very tasty. False chanterelles (Hygrophoropsis aurantiaca) look very similar to chanterelles, except that their false gills are blunt instead of sharp. I have read that false chanterelles could cause stomach issues and even hallucinations. I haven’t seen either in the wild, only the lovely chanterelle.

Vegan Lobsters


Isn’t it striking?

My first experience with a lobster mushroom (Hypomyces lactifluorum) was about a year and a half ago, eating a good-bye dinner with friends at Sitka & Spruce, an underground foodie restaurant in Seattle. I guess it’s not so underground anymore but the concepts of farm to fork, local, seasonal and sustainable are echoed in every detail of that restaurant and their daily changing menu. I was very impressed that they easily (and deliciously) did an impromptu 5 course vegetarian family style dinner for us. And I met the lobster mushroom. They served it with vermicelli and a delicate sauce (of which I don’t remember). The mushrooms stood out. I almost called the server back to the table because it looked like lobster meat and had the same texture and flavor of lobster meat. I was assured that they were locally foraged, hand-picked lobster mushrooms. I was never a fan of lobster growing up, only if I bathed it in butter. At that point I was just eating butter with something to chew. But I’m not against a meaty, earthy taste and immediately loved the mushrooms (once I knew it wasn’t a crustacean).

Occasionally I’ll see fresh lobster mushrooms at farmer’s markets or specialty grocery stores (for outrageous prices). But the ones in the store are old, dried and decaying. I’ve been finding more and more in the woods lately on various hikes and foraging expeditions for chanterelles and it’s really exciting to find them. They are bright orange and easy to spot on the forest floor (usually they are peeking out under the leaves). There aren’t any lookalikes for this mushroom, but it is important to make sure it’s the right kind of lobster, because it really isn’t a mushroom after all.


Cross-section

It is a parasitic mold that takes over other wild mushrooms. If you cut it open, you don’t see the other mushroom inside. All of the old mushroom’s tissues have been turned to “lobster.” I think it’s fascinating. Luckily for the forager, the lobster fungus is edible. The scary part is if the lobster is growing on a toxic mushroom, thus bad news for belly or worse. My readings have instructed me that the bright red lobster mushroom is selective and only grows on specific Russula or Lactarius mushrooms (both edible). I can’t find any info about look alikes to the lobster, it seems pretty unique. There is a lobster-like mold that takes over toxic mushrooms, but the photos I’ve seen it looks nothing like the classic lobster mushroom. So I will not worry and be sure to cook it for at least 15 minutes before enjoying it. I’ve had lobster mushrooms in meals over the past two weeks with no sick feelings, so I will trust the experts.

What to eat it with? Since it’s meaty and sort of fishy, simple pasta dishes are nice, as are sautees with garlic and olive oil. You could also marinate it and grill it, which sounds awesome. I made a risotto with them and chanterelles and that was a nice welcome dish for fall. They are about $10/lb at my local grocery store if you are too scared to forage for them.

Morel Madness


Meaty and wild

It appears that morels are gaining more popularity every year, or it could be that I live on the West Coast and am around them more often. My brother in Vermont has spent years seeking the elusive morel, while my husband grew up picking morels by the bagful in Washington. Since I’ve moved to the West, we try to visit my in-laws every morel season, which lasts only a few weeks every spring (once the snow recedes). Morels tend to like disturbed ground such as previous fires or logging. I’ve seen them growing near evergreens, mostly pine and Douglas fir. They are also found in moist woodlands and along river bottoms. It’s funny they grow near pines, because they sort of look like pine cones which makes finding them a little difficult to spot. It’s not a giant puffball in a meadow or a bright orange lobster in a sea of brown duff, it’s totally camouflaged, adding to the challenge of the “hunt” and the enjoyment of the reward.

Morels are pretty easy to identify and luckily don’t have any deadly lookalikes, except the false morel.  The false morel is more brainy looking and the bottom edge of the cap hangs like a skirt, where the true morel wears leggings. The real challenge is not the i.d., but rather finding morels before the bugs get to them. They become bug hotels if you don’t find them soon enough. Morels aren’t usually dirty, so cleaning them is easy if they aren’t buggy. I like to slice the larger ones in half and throw them all into a bowl of salt water to let the bugs escape. If I’m not eating them right away, I store them in a container with a damp towel on top to retain moisture. You can easily dry them out in a dehydrator if you want to wait until winter to put in a creamy soup. I usually can’t wait that long and fry them all up.

Do you want to feel good about eating morels? They are low in calories, carbs, sodium and are fat free. They contain vitamins B, D and are a source of protein. If there’s a little dirt on it, you’re probably getting your B 12 as well. Traditionally, morels have been consumed to prevent cancer, improve eyesight, hearing and circulation.  So fry them up in a little Earth Balance and garlic and chow down.  They are also amazing in omelettes, so I’m looking forward to next spring to try them with FatFreeVegan’s omelette recipe.

Puffball Parm


NOM

My earliest memories of puffballs are finding them in my childhood backyard and kicking them as hard as I could. I loved to watch the pouff! of spores as they were released into the air. Had I known then what I know now, I would have treated them with more respect. Most puffballs are edible! and free! and grow in nature! How exciting. There are many different types of puffballs out there and on the foraging day trip with Wildman, we found a few giant puffballs. No one else in the group wanted them, so Steve and I divied them up. He reccommended to do a parm dish, reminiscent of eggplant parmesan. The mushroom is really meaty and kind of rubbery. I don’t feel comfortable providing i.d. of puffball to the world as of yet, but my books say when the puffballs are young, they are edible. When they are full of a bomb of spores, they are not edible. You must cut them open to make sure it is white and meaty inside because it can be confused with young, toxic agarics. Get a book and take your mushroom to your local mycological association if you are unsure of anything. Please.

So, puffballs are yummy and are mostly found in fields and open areas. One of my books says that in England, passerby’s might confuse the giant puffballs to be grazing sheep. The giant puffballs can be up to a foot in diameter, which means good eats. Puffballs are next on my list to become 100% confident for foraging. Problem is, I just don’t find them that often anymore. Let’s eat!

Puffball Parm (beta)
Yields: 4 servings, feel free to vary the recipe if you have more/less mushrooms or want to sub eggplant
This dish is really tasty and you can vary it to your liking. I didn’t bother to do the whole breading situation with the mushroom, but you can if you want to. I’d like to try them again with a cornmeal beer batter, and when I do, it will be posted

Ingredients
1 pound puffball mushroom, outer skin peeled, cut into 1/4″ thick slices
2 cloves garlic, minced
1/4 tsp crushed red pepper (or more to taste)
1 Tbl + olive oil
2 – 28oz can tomatoes (I like peeled plum tomatoes packed in their own juice, but feel free to use crushed or tomato sauce and omit the paste and spices)
6 leaves basil, chiffonade
1 tsp oregano, dried
1 Tbl tomato paste
8 oz vegan cheeze of choice (I like Teese)
1/4 cup Almesan (V’con)

Method

  1. Preheat oven to 375 deg F.
  2. If not using prepared sauce, make your tomato sauce. Heat 1 Tbl of olive oil in a skillet and when hot, add garlic and crushed red pepper. Saute for 30 seconds on medium heat.
  3. Add the tomatoes (if whole, crush them in your hands while adding), basil, oregano and tomato paste. Reduce heat and simmer for 10 minutes, adjusting flavors (salt!). Set aside for later.
  4. In a separate skillet, heat enough oil in the pan to sufficiently fry the mushrooms. When the oil is hot, add the puffball slices and fry until the juices are released and you have some color on the mushrooms.
  5. Flip the slices and fry the other side until most of the mushroom juices have been cooked off.
  6. In a 7×11″ baking dish (or whatever you have), place a thin layer of sauce and then layer the ingredients as follows: 1/3 of the mushrooms, 1/3 of the mozzarella, sprinkle of Parm, 1/3 of tomato sauce and repeat 2 more times.
  7. Bake uncovered for 30 minutes, remove from oven and let sit for 15 minutes.
  8. Eat and enjoy!

Note: This recipe is veganized and is currently in beta, so be kind. Feel free to add your changes or thoughts.

Mo(nth of)fo(od): Wild Mushroom Week


Great success!

It will be a challenge to blog 5 times a week. Don’t get me wrong, I have plenty of material, but making time to blog this often is a hurdle. It is good for me. I don’t blog enough and luckily there are others out there taking on this challenge with me. Many bloggers are doing themes, so I thought this week I’d introduce a theme I could blog on for weeks (but don’t hold me to it!). This week I will blog about mushrooms and how wonderful they are.

Let’s start today off with my introduction into foraging. I’ve always enjoyed strange textures (converting to tofu was not a challenge) and flavor combinations and grew up around normal, store mushrooms. My introduction into foraging was in college through my brother, who took me out for chanterelles. Walking through the woods in Vermont is a pleasure in itself, but returning with a bag full of mushrooms to fry up, well, that’s heaven.


Honey mushroom heaven

It seems like everyone I know that forages learned from someone else and I couldn’t find any “classes” or “workshops” anywhere to expand my knowledge and desire to forage more. Most foragers are secretive and don’t want to share their “spots,” for good reason. Who wants to find a great mushroom patch and then have it over-picked and none for you? Plus some foragers make their living selling their treasures. Regardless, I’ve been determined throughout the years to learn, but not motivated enough to read up on it. I’m very hands-on and visual oriented and reading about it will not make me feel confident to just go out in the woods alone and pick something.


The “Wildman”

I don’t remember how I stumbled upon him, but a few years ago while externing at a restaurant in NYC, there was a foraging trip offered by the Wildman. Steve Brill, also known as the “Wildman,” lives in New York and has a website with recipes, photo identification and a lot of information. He has a very thick cookbook with recipes I am dying to try, all based off wild edibles. He knows his stuff and it was fun to share his geeking out on edibles…sound like someone familiar? He is best known for getting arrested in Central Park leading a foraging field trip. Apparently it’s illegal to eat the dandelion greens in Central Park. I was excited to join the group for a day, even if it was pretty tame. I think I was the closest botany nerd, but Steve won hands-down in that category. It was a small group, varied ages and interest. Everyone was nice and wanted to learn, which is an ideal setting to be in. I tried to keep close and learn as much as I could. We were in Queens Park that day, a beautiful park where at points you don’t even know that you are in the city. We found a lot of stuff. I had a big bag at the end of the day, but didn’t feel any wiser for my ability to i.d. I guess that comes with time. I picked burdock (gobo!), sassafrass root (to make homemade root beer the next day) and a variety of mushrooms: shaggy mane, honey mushrooms, giant puffball and probably a few others I can’t remember. People were timid to pick the mushrooms, which worked out in my favor. I gathered quite a bit and the dishes I consumed with no stomach anger were: puffball parmesan, a cream sauce using the inky caps to put over chik’n and sauteed honey ‘shrooms with garlic. It was all delicious and in time, I’ll be able to find them on my own, confidently. I’ve reminisced enough today. Tomorrow I will share the puffball recipe!

How to Roast a Pepper


In the oven

I have mixed emotions about peppers. They are beautiful to look at and pair nicely with a lot of ingredients, but I must admit, I’m not a fan of raw peppers. Occasionally I’ll enjoy their crunch in a salad or on a sandwich but I rarely buy them unless my goal is to roast them into sweet pepper heaven. I may not like them raw and I may not have a preference for green peppers, but roasted peppers are amazing. The most amazing thing about them is that they are easy to make. So stop buying roasted peppers in jars and get a bottle of wine instead and roast them yourself. There are many methods to roasting peppers, such as burning the skin over a gas range using tongs or in a dry cast-iron skillet. I prefer the oven method because I can get other stuff done while they are roasting and the end result is still awesome.


10 minute rest

I’ll just chat myself through this recipe because it’s not the most structured process, so the recipe won’t be either. Ready? Buy some peppers. Maybe the farmer’s market has a farmer with a surplus or you have an overflowing garden or there’s a sale. Buy more than you think you can eat because we’ll preserve some for later so you can use them in quick dinners when you don’t have the time to roast and you won’t be tempted to get that store bought fancy stuff. Wash and dry the peppers. Preheat your oven anywhere between 375 deg F and 450 deg F, depending on how smoky you want them to taste. You can also do this under the broiler if you put the rack up close to the boil element. Put your peppers on the pan, pan in the oven. Now open a bottle of wine or start your rice or whatever you feel like doing.

Check on your peppers every 5 minutes or so and if they are getting nice and burnt, turn them over with some tongs until all of the skin is burnt and blistery looking. Once the whole pepper is thoroughly browned or roasted to your liking, put the peppers in a bowl and cover it with whatever you’ve got to make a seal. I use plastic wrap but if you have a bowl or pan with a lid, you can use that too. Set your timer for 10 minutes and pour yourself another glass of wine.


The process

Now comes the labor. Uncover your peppers and have another bowl ready with a strainer on top of it. Start peeling the skin off the pepper using your fingers or the back of a paring knife, letting any of the juices go into the bowl and the seeds and skins go into the strainer. Once the skin is removed, take off the stem and de-seed as well as you can. Cut the peppers however you like them. I prefer strips.


Roasted, peeled and ready to eat

Store the peeled, seeded peppers in their own juices in an airtight container in the fridge for up to a week. I like to pack some peppers into a jar with olive oil, salt, roasted garlic and a little balsamic vinegar and spread it on bread. Roasted peppers make a good addition to tomato sauces, pizzas and pretty much anything. To preserve anything you think you won’t eat in a week, spread the peppers on a sheet pan and put in the freezer for an hour. Once they have hardened a little, peel them off the sheet pan, ziplock it and keep it in the freezer for those handy moments when your dinner needs a little pizzazz. Enjoy and know that you are getting plenty of Vitamin C, A and K, fiber and plenty of antioxidant for preventing cancer. Interestingly enough, all peppers contain a substance that causes your body to increase it’s heat production and oxygen consumption for 20 minutes after eating, meaning you burn more calories after eating peppers than other foods.

Vegan Rhubarb Coffeecake Recipe


Moist and delicious!

My friend made this coffeecake at my bridal shower way back in my “fiance” days. It was amazing. A gift at my bridal shower was a recipe compilation from my friends and family (they each submitted a recipe and a photo of them and it was all combined into an album for me). Included in this lovely book that sits on my cookbook shelf is the same coffeecake recipe, which I veganized and added a crumb layer (adapted from VWAV) on top for more tastiness. This recipe uses a LOT of rhubarb, so if you have an abundance, rejoice, and if you do not, feel free to cut the recipe in half.

I adore rhubarb and spent my childhood eating rhubarb jam and rhubarb bread throughout many summers. My parents had a huge patch of rhubarb in their garden and to me, rhubarb has always been free. I had no idea how expensive it is until I moved west and didn’t have my mom nearby to make me jam and bread. One day I’ll grow it in my yard too, but first I need a yard. Rhubarb, relative of the humble buckwheat, doesn’t need much love to grow in the Pacific NW and it will survive year after year without complaint. Be warned that the leaves are toxic and consume only the stems. The roots have medicinal uses as a laxative. The stems are high in Vitamin C, fiber and calcium. It can also help in reducing risks of cancer, reduce high blood pressure and is an antioxidant. I love it for it’s tart flavor and the fact that it signifies to me that it is spring or summer. My all-time favorite use of rhubarb is in a pie with strawberries, but this recipe is a close second.


Cooling in the pan

Rhubarb Coffeecake
Yields: 12 servings depending on how greedy you are.

Ingredients

  • 1 Tbl flax seeds, ground
  • 3 Tbl water

Crumb topping

  • 1/4 cup ap flour
  • 3 Tbl evaporated cane juice/sugar
  • 1/4 tsp cardamom
  • 1/4 tsp cinnamon
  • 1 Tbl canola oil

Cake ingredients, continued

  • 3 Tbl applesauce
  • 2 cups evaporated cane juice (or sugar of choice)
  • 2 Tbl molasses
  • 1 cup canola oil
  • 4 cups rhubarb stems, medium dice
  • 2.5 cups ap flour
  • 1 tsp salt
  • 1 tsp baking soda
  • 1 tsp baking powder
  • 1 tsp cinnamon
  • 1/2 tsp cardamom (or not, I love it)

Method

  1. Preheat oven to 300 degrees F and get out your 9×13″ pan or 2 loaf pans.
  2. Whisk together flax meal and water and set aside.
  3. Make crumb topping: Mix flour, sugar and spices in a small bowl and mix together (whisk, fork, fingers) while drizzling oil in. Once it becomes crumb-y, set it aside. It’s possible you may need less or more oil depending on where you live, the age of your flour and the humidity in the air.
  4. In a medium bowl, mix together applesauce, sugar, molasses, oil and flax/water goo.
  5. In a separate bowl, mix together flour, salt, baking soda, baking powder, cinnamon and cardamom.
  6. Add the dry ingredients to the wet ones and mix until JUST combined.
  7. Fold in rhubarb and pour into pan(s). Top with crumbs.
  8. Bake for one hour or until a knife inserted comes out clean.
  9. Cool on a wire rack and eat.

This coffeecake freezes really well if you make a full batch and don’t want to o.d. on rhubarb. I wrap mine in aluminum foil and freeze and when I’m ready for more, I defrost it in the fridge overnight. It’s really satisfying for breakfast and just remind yourself that rhubarb is a vegetable, so you can start your day off right.

Vegan MoFo Day 1: Waffles & Preserving Lemon Juice

So begins vegan mo(nth of)fo(od), a month-long vegan blogging extravaganza throughout the interweb. There are over 200 people participating, flooding the internet with vegan recipes, ramblings, pictures and more. I am participating this year and the goal is to blog at least 5 times a week. There is a photopool over at Flickr as well.


Corny Lime Waffles and Blue Flannel Hash

I’ll start the month off with something simple. Breakfast! The waffle recipe is the Lemon Corn Waffles from Vegan with a Vengeance. These waffles are easy to make and come out amazing. The soy yogurt makes them light and airy and perfect. I’ve substituted the yogurt for blended tofu and it’s also good, but I prefer it with the yogurt. I also used lime juice instead of lemon juice and didn’t notice any major changes in flavor. Since I seem to encourage fruit to mold, I have a nice trick for maintaining a supply of fresh lemon and lime juice. When I buy the fruit, I zest it using a microplane and put that in a ziplock bag in the freezer. Then I juice whatever I have and measure out a tablespoon of juice into each compartment in my ice cube tray. Once the cubes are frozen, I put them in a jar and keep them in my freezer until I need them. I find that whenever I do a last minute dinner and it calls for lemon juice, I never have a fresh lemon on hand. Not anymore! My freezer is stocked and ready for future batches of waffles or whatever.

I ate the waffle with my homemade ginger syrup (cut with some maple syrup and Earth Balance because it’s spicy stuff) and the blue flannel hash from V’Con. I had to cook the potatoes a bit longer than called for in the recipe because I didn’t cut them small enough. It’s a hearty, satisfying dish, but I realized I never liked hash growing up, so it’s not a favorite. I think it’s a textural thing; I prefer my potatoes crispy.

Cereal Killer Pie: Coconut Pie, Grape Nut crust & Caramelized Nanners

I was invited a cereal themed birthday party recently and felt that I should do something fun with breakfast cereal.  I had a feeling rice krispie treats would make an appearance regardless, so I thought of one of my favorite breakfast cereals, Grape Nuts, and the rest just followed suit.


Breakfast & dessert together at last.

I thought that Grape Nuts would make a nice pie crust, except that they are SO crunchy and are sort of intense to eat.  I put them in the food processor, hoping that my blade wouldn’t dull from the hard labor.  It took awhile, but it got to more of a graham crumb consistency (but still retained it’s crunch).  I mixed the crumbs with melted Earth Balance and pumpkin seed milk until I could squeeze it into a ball. I added some shredded, unsweetened coconut to the crust as well.  For the filling, I used the Lost Coconut Pie from Veganomicon and topped it with caramelized bananas.  If I made it again, I would use 1/2 the amount of coconut in the filling and use fried plantains on top.  Regardless of my perfectionism, it was decadent, creamy, and a hit at the party. I’d eat this for breakfast!